[views 2.0 版] 使用 views 建立tabs, use view to build tabs
tabs 一直是Drupal 中比較少特別提及的功能之一
用戶頁 user/[uid] 便是一個很標準的tab 應用
"view"/"edit" tab 也常見於node 頁
使用views 可以很方便的建立tabs
前文Drupal 5 版: http://www.joetsuihk.com/node/112 中已經介紹過
那是Drupal5, views1 的版本
這次介紹 Drupal6, views2 的版本的設定方法
這次是建立一個tab
顯示用戶建立的node 之中, 留言數目大於10 的頁面, 定義為 "hot"
路徑 user/[uid]/hot
如圖: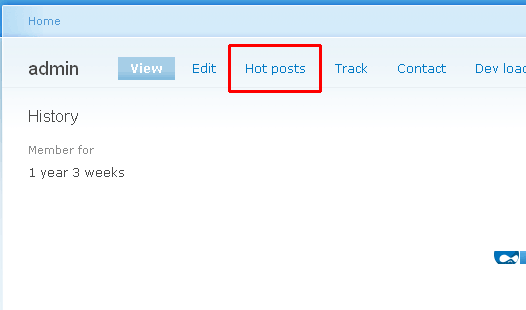
我從內建的 tracker 模組的views 開始,
用 clone, 建立一個新的views,
其中, page 的設定:
page settings: 選menu tab
(Default meni tab 是作為預設顯示時才用, 如路徑 user/[uid] )
之後設定頁面的Title, 便完成了
| Attachment | Size |
|---|---|
| 9.56 KB | |
| 18.55 KB |
將搜尋結果排序
最近做的一件案子中,
有一個比較少見但有時候很實用的功能需求
就是要將搜尋的結果以某條件排序
例如搜尋一些新聞, 時間性很重要
想要將最近相關的新聞排先, 以日期順序
但內建的搜尋是以相關性排序, 最相關的排先
思路:
首先是排序
排序首選是views
但views 的 filter 過濾器並沒有搜尋相關字的設定
但使用views table 排序是最方便的
views 自己就內建
所以我要將搜尋的結果傳給views
自然是使用 arguments 了
找出搜尋結果的nid, 再用逗號分隔, 傳給views
再將views 內嵌到serach result 的頁面
實際解決辦法, 設定:
先新增一個views,
顯示設定為table, 可排序
再到fields 選擇所需的欄位
重點在argument 的欄位,
選Node:nid
Provide default argument
PHP code:
<?php
$results=node_search('search',arg(2));
  $size = count($results);

  for($i=0;$i<$size;$i++){
    if ($i+1==$size){
      $output .= $results[$i]['node']->nid;
    }else{
      $output .= $results[$i]['node']->nid.",";
    }
  }
return $output;
?>
Argument type: Node id separated by , or +
選中 Allow multiple terms per argument.
結語:
需然這個方法不是很完美(實際上這是做了兩次一樣的搜尋)
但既然主機的能力不是問題, 開發時間也不多
完成任務還是最重要的
將註冊時連續輸入兩次密碼的表單的字眼改掉
將註冊時連續輸入兩次密碼的表單的字眼改掉的方法:
theme 的 template.php 內:
<?php
function phptemplate_password($element) {
  if($element['#id']=='edit-pass-pass1'){
    $element['#title']=t('joe');
  }

  if($element['#id']=='edit-pass-pass2'){
    $element['#title']=t('confirm joe');
  }

  $size = $element['#size'] ? ' size="'. $element['#size'] .'" ' : '';
  $maxlength = $element['#maxlength'] ? ' maxlength="'. $element['#maxlength'] .'" ' : '';

  _form_set_class($element, array('form-text'));
  $output = '<input type="password" name="'. $element['#name'] .'" id="'. $element['#id'] .'" '. $maxlength . $size . drupal_attributes($element['#attributes']) .' />';
  return theme('form_element', $element, $output);
}
?>
其實其他的form 元素都可以用同一個方法改
甚至改為select 都可以
但亂改一通可能會令數據庫資料丟失
所以, 結構邏輯的修改還是使用 hook_form_alter() 吧
Drupal6.x 自定form template
| Attachment | Size |
|---|---|
| 1.08 KB | |
| 1.39 KB |
今日重看form template 的組成 :http://www.joetsuihk.com/form_templates6
混亂得我自己都看不明白, 所以重寫
目的: 重新排位, 令建立新node 的表單簡單點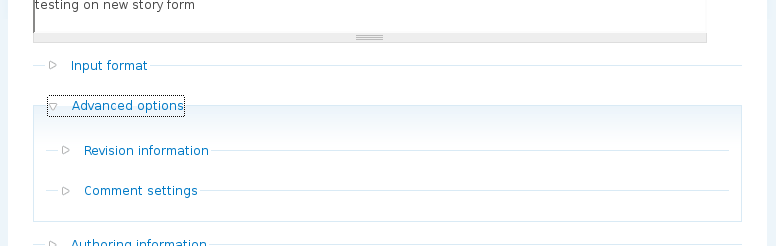
假設: 要重新排位的 content type 名為 story
- 在theme 內建立檔案 node_form.tpl.php
- 將 http://api.drupal.org/api/function/theme_node_form 的函數內容貼到 node_form.tpl.php (除去函數開頭結尾), return 改為 print (或直接使用附件)
- 打開theme 內的 template.php
- 建立函數 function phptemplate_preprocess_node_form()
- 複製node_form.tpl.php 為 story-node_form.tpl.php (theme 內要保留一個可用的node_form.tpl.php)
- 修改為:(附件2)
function phptemplate_preprocess_node_form(&$vars) {
  $vars['template_files'][] = $vars['form']['type']['#value']."-node_form";
} $output = "\n<div class="node-form">\n";
$admin = '';
if (isset($form['author'])) {
$admin .= " <div class="authored">\n";
$admin .= drupal_render($form['author']);
$admin .= " </div>\n";
}
if (isset($form['options'])) {
$admin .= " <div class="options">\n";
$admin .= drupal_render($form['options']);
$admin .= " </div>\n";
}
$buttons = drupal_render($form['buttons']);
$advance = drupal_render($form['menu']);
$advance .= drupal_render($form['revision_information']);
$advance .= drupal_render($form['comment_settings']);
// Everything else gets rendered here, and is displayed before the admin form
// field and the submit buttons.
$output .= " <div class="standard">\n";
$output .= drupal_render($form);
$output .= " </div>\n";
if (!empty($admin)) {
$output .= "<div><fieldset class='collapsible collapsed advanced standard'>";
$output .= "<legend>Advance</legend>";
$output .= "<div class='fieldset-wrapper'>";
$output .= $admin.$advance;
$output .= "</fieldset></div></div>\n";
}
$output .= "<div>$buttons</div>";
$output .= "</div>\n";
print $output;重點:
第四步, $vars['form']['type']['#value'] 是content type 名, $vars 可以用kprint_r() 或者 theme developer 查看可以變數
第五步, 一定要留一個node_form.tpl.php 在theme 之內, 是Drupal 對自定義template 的要求
第六步, 使用過drupal_render() 的表單元素並不會在drupal_render($form); 再輸出, 只輸出未使用過的元素, 很方便
[2009-01-12] Drupal localhost 多站開發, Drupal localhost multi-site config
作為一個 Drupal developer, 通常都有幾個開發同時進行
一般人可能會用htdocs/[folder] 名
例如 http://localhost/drupal6, http://localhost/drupal5
或者案子名 http://localhost/blog 等等
但萬一core 要更新, 或者cck, views 有更新
便要更數個站, 實在麻煩
大家都或者知道 Drupal 是可以設定 multi-site 的
即是, 同一套code 可以供給兩個站使用 ( 例如 example1.com 和 example2.com )
優點很簡單, 模組更新的時候, 只要更新一次便可以令兩個完全不相關的 Drupal 站更新模組
而兩站可以使用完全不同的模版, 完全不同的資料庫
只是共用 core 和某些常用的模組 (例如views, cck 之類)
你的 drupal-root 內的 sites 資料夾,
可以建立 all, example1.com, example2.com 等等的資料夾
all 內的 modules, themes 是供放多站共用的資料
而 example1.com 內也可以建立 modules, themes 資料夾, 放這個域名專用的模組
所以現在只要將某個domain 指到 localhost
便可以實現 http://blog.localhost/drupal6, http://shop.localhost/drupal6.........
到 C:\WINDOWS\system32\drivers\etc\hosts
127.0.0.1 blog.localhost
127.0.0.1 shop.localhost
...
..
再在 htdocs/drupal6/sites/blog.localhost/ 內建一個 settings.php 便可以了
便可以 http://blog.localhost/drupal6/install.php 了
