教學: 建立 Zen sub-theme
Zen 稱它是 Drupal 內的最好的初始版型Drupal.
"如果你要建立一個符合規範的版型, 你會發覺, 使用 Zen 會比修改 Garland 或者 Bluemarine 容易得多"
它的 README 有一步一步的教學:
- 將 Zen 內的 STARTERKIT folder 複製到 zen 之外, 並修改資料夾名稱為你的版型的名稱.
但留意, 版型的名稱一定使用小階的英文字母作開頭, 名稱只可以包含小階的英文字母, 數字和底線 (underscores)例如, 複雜 sites/all/themes/zen/STARTERKIT 資料夾, 重新命名為 sites/all/themes/foo
這個步驟的目的是令你的客製版型 (sub-theme) 有一個自己的資料夾. 這會令 zen 版型的升級更容易. - 在你的新版型的資料夾, 將 STARTERKIT.info.txt 重新命名為你的版型的名稱, 然後移除 .txt 這個副檔名. 再修改 .info 檔案內的 "name" 和 "description" 欄位
例如, 重命名 foo/STARTERKIT.info.txt 為 foo/foo.info.
將 foo.info 內的 "name = Zen Sub-theme Starter Kit" 修改為 "name = Foo" and
"description = Read..." 修改為 "description = A Zen sub-theme"
<br />
.info 檔案是提供一些有關這個版型的基本資料給 Drupal: 名稱, 簡介, 功能, 區域, 包含的 CSS 檔和 JS 檔等. 詳情可以到 http://drupal.org/node/171205 了解更多
最後, 到 admin/build/themes 以更新 Drupal 6 的緩存
- zen 的 STARTERKIT 預設是使用指定闊度的版面的. 如果你需要的是一個浮動的闊度的版面的話, 你可以刪除 layout-fixed.css 和 layout-fixed-rtl.css files 然後修改 sub-theme 的 .info 檔案, 將 layout-fixed.css 締換為 layout-liquid.css
例如, 修改
      stylesheets[all][]   = css/layout-fixed.css
成
      stylesheets[all][]   = css/layout-liquid.css
<br />
.info 內的 "stylesheets" 定義版型內的 CSS 檔案路徑和 media type, 只要遵從以下的格式:
  stylesheets[MEDIA][] = path/to/file.css
<br />
然後到 admin/build/themes 以清除緩存
<br />
如果你使用其他的 CSS 版型, 例如 Blueprint 或 960.gs 你可以締換 "css/layout-fixed.css" 成你喜歡的版型的 CSS 檔案 -
修改 template.php 和 theme-settings.php 內的 "STARTERKIT", 修改成你的 sub-theme 的名稱
我們建議你使用文字修改器, 使用 "搜尋和締換全部" 的功能來完成修改 - 使用 administrator 登入, 到 Administer > Site building > Themes (admin/build/themes) 和啟用你的 sub-theme
- Internet explorer 有一個 bug 令你不可以使用超過 31 個 CSS 檔. 在發版型的期間, 你可以下載 "IE CSS Optimizer" 模組http://drupal.org/project/ie_css_optimizer 以避開這個限制
在 live 的環境, 你應該啟用在效能頁面的 CSS 優化設定
- 修改 ZEN 的核心 template 檔案:
如果你需要修改在 zen 資料夾內的 .tpl.php 檔案, 複製那檔案到你的 sub-theme 的 template 資料夾, 再修改之, 最後再清除緩存例如, 複製 zen/templates/page.tpl.php 到 foo/templates/page.tpl.php. - 修改搜尋表單的 template:
複製 modules/search/ 內的 search-theme-form.tpl.php 到 sub-theme 資料夾, 清除緩存.Drupal 核心的 templates 的列表可以到以下的網址查閱:
http://drupal.org/node/190815
可選設定
hook_apachesolr_prepare_query()
| Attachment | Size |
|---|---|
| 5.58 KB |
Apache solr/PHP solr client 可以使用的 development API 其實還有很多
這次介紹的是其中一個最常用的 hook_apachesolr_prepare_query()
<?php
function MODULE_NAME_apachesolr_prepare_query(&$query, &$params, $caller){}
?>
這個 hook 的用處是可以直接修改傳到 solr 的 query
例如用代碼增加只搜尋某一個 content type (其實 apachesolr_search 已經這一個選項, 見圖)
或者代碼增加 content type=='restanrant' OR taxonomy=='Food' 之類不可以在 views 中達成的複雜 search query
apachesolr 的search filters
prepare_query() 函數的參數 $query 是一個 object, README.txt 的例子中使用 add_filter() 可以新增 AND 的 filter,
也可以使用 add_subquery() 增加 OR 的 filter
$caller 是一組辦悉用的代號, 例如 apachesolr_search.module 的 search 中, $caller 是 apachesolr_search
因為其它模組也可以使用 apachesolr 的 API(上一篇已經提過), 可以區分其他開使用 apachesolr 的搜尋
例如一個自定搜尋的例子:
<?php
  $temp_q = apachesolr_drupal_query();
  $temp_q->add_filter("tid", $tid);
  $cuisine_query->add_subquery($temp_q, 'OR');
?>
例如一個自定模組可以:
<?php
apachesolr_search_execute($kewords, '', 'score desc', '', 0, 'search_food');
?>
加上 hook_apachesolr_prepare_query, 'search_food' 便是 $caller 的值
可以專為 search_food 自定義合適的 filters
ref:
README.txt
query class implements Drupal_Solr_Query_Interface
interface Drupal_Solr_Query_Interface
分開 apachesolr 和 apachesolr_search
| Attachment | Size |
|---|---|
| 26.58 KB |
下一個進階的 solr blog 已經寫了大半, 但發覺有必要分開一篇
先談談 apachesolr 和 apachesolr_search 的分別
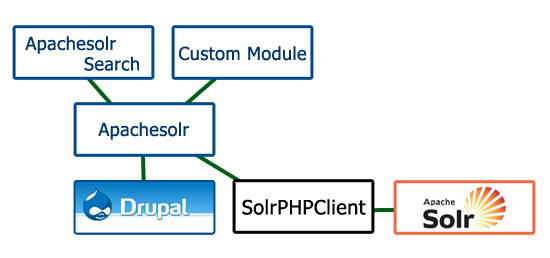
apachesolr 是一個接口模組, 是連接 Drupal 和 SolrPhpClient 的接口
而 SolrPhpClient 是 PHP 和 solr 的接口
但 solr 是 java base 的, 而且其實有一個易用的 web service query 接口: /solr/CORE0/admin/form.jsp
所以, 嚴格來說, 假如你要自己硬幹, 是可以不使用以上的接口的
但當然無需要就不必重做輪子了
apachesolr 的功能包括提供方便的函數,
以調用正在處理的 query, query 的參數, 它的回傳 response, response 的列數目等等
也會送出 cck 的欄位的資料到 solr
而 apachesolr_search 的工作是提供一個 apachesolr 的實作
提供多個 filtering 的 block, current results 的 block, 取代原生的 search 模組, 可以取代 taxonomy page等等
所以 apachesolr_search 是一個很好的範例, 連同 contrib/apachesolr_nodeaccess 等等
也可以觀察多個 solr 模組實作的時候的分別, 從而參考出自建一個模組的話, 要留意的地方
大家都理解的話, 希望下一篇大家小心分清楚它們的分別就可以了
令 Solr 將 filefield 和 textarea 的資料都放到 index 6.x-1.x
Drupal apachesolr 的原設定是不會 將 textarea 的文字作為 index 的一部份傳到 solr 的
只會將 body 和 teaser 傳到 solr
原因是 textarea 的 fulltext search 需要 index 的機會很少
但也做成另一個問題, 就是返回 search result 的時候
如果顯示結果需要其中一個 textarea
便會需要一個 node_load()
同樣的情況也出現在 filefield
我的 search result 需要顯示圖片
但我不想每一次都 node_load 一下
而額外增加 index 的語法在 README.txt 也有清楚說明
hook_apachesolr_cck_fields_alter(&$mappings)

  Add or alter index mappings for CCK types.  The default mappings array handles just
  text fields with option widgets:
  為 cck 類增加或修改 index mapping. 預設只對使用 options 的 text 有 mapping:

    $mappings['text'] = array(
      'optionwidgets_select' => array('callback' => '', 'index_type' => 'string'),
      'optionwidgets_buttons' => array('callback' => '', 'index_type' => 'string')
    );

  In your _alter hook implementation you can add additional field types such as:
  你可以曾加自定的 field type:
    $mappings['number_integer']['number'] = array('callback' => '', 'index_type' => 'integer');

  You can also add a mapping for a specific field.  This will take precedence over any
  mapping for a general field type. A field-specific mapping would look like:
  也可以對特定的 field 做 mapping:
    $mappings['per-field']['field_model_name'] = array('callback' => '', 'index_type' => 'string');

  or

    $mappings['per-field']['field_model_price'] = array('callback' => '', 'index_type' => 'float');
我便只對特定的 field (一個 textarea 和 imagefield) 加 mapping:
<?php
/**
 * Drupal default do not index images and textarea, add them to index too for search result display
 **/
function ge_search_apachesolr_cck_fields_alter(&$mappings)
{
  $mappings['per-field']['field_main_image'] = array(
    'index_type' => 'string',
    'callback' => 'ge_search_apachesolr_field_main_image_callback'
  );
  $mappings['per-field']['field_specialities'] = array(
    'index_type' => 'string',
    'callback' => 'ge_search_apachesolr_field_specialities_callback'
  );
}

function ge_search_apachesolr_field_main_image_callback($node, $fieldname)
{
  $fields = array();
  foreach($node->$fieldname as $field) {
    $fields[] = array('value' => $field['filepath']);
  }
  return $fields;
}

function ge_search_apachesolr_field_specialities_callback($node, $fieldname)
{
  $fields = array();
  foreach($node->$fieldname as $field) {
    $fields[] = array('value' => $field['value']);
  }
  return $fields;
}
?>
留意我是將 imagefield 的 filepath 傳到 solr
原因是返回的 search result 只需要 filepath 便夠了,
也可以方便使用 theme('imagecache') 之類進行輸出圖片
ref: http://www.acquia.com/blog/understanding-apachesolr-cck-api
Apache solr 多站設定 multi core setup
在 solr 的詞彙裏面, mulit site 的意思是指一個實體 solr 對應多個網站
和 apache virtual host 類似,
所以你可以同一部機器的一個 solr 放置數個站, 方便管理
而 solr 自帶的 example 資料夾本身已經有一個 multi site 的範例
而要認識 mutli core 的設定, 便先要了解 solr 的預設檔案結構:
start.jar
solr/
--conf/
----schema.xml
----solrconfig.xml
這邊只列出重要的檔案, 其中的 schema.xml 和 solrconfig.xml 都應該要換成 Drupal 自帶的
這是單站的設定, 而多站的設定:
start.jar
solr/
solr.xml
--core0/
----conf/
------schema.xml
------solrconfig.xml
--core1/
----conf/
------schema.xml
------solrconfig.xml
多出了一個 solr.xml 和個資料夾, core0 和 core1
solr.xml 內定義了:
<cores adminPath="/admin/cores">
  <core name="core0" instanceDir="core0" />
  <core name="core1" instanceDir="core1" />
</cores>
對應建立兩個資料夾, 和對應的兩個資料夾名稱
再將 conf 複製便完成了
打開 jetty 之後, 你可以到 /solr/core0/admin, /solr/core1/admin 確認成功設定
而 Drupal 內的 solr path 也需要對應輸入新的 subfix
順帶一提, core0 core1 的命名是不理想的,
應該使用例如 blog, uat, live 之類更加清晰的命名
core0 core1 的命名只是為了簡單解說而已
